If you use the Smart Life app to manage your smart home, one of its most important features is “scenario writing.” By creating a scenario, you can control multiple devices automatically or with a simple touch. In this tutorial, you will learn how to enter the scenario section and create two types of scenarios: Tap to Run and Automation.

Methods of entering the scenario writing section in Smart Life
There are two simple methods to write a scenario in Smart Life:
Method 1: Via the toolbar at the top
Enter the application. Click on the blue circle in the toolbar at the top of the page. Select the Create Scene option. Enter the Scenario tab.
Method 2: Via the toolbar at the bottom
On the main page of the application, click on the Scene option, which stands for scenario, from the toolbar at the bottom of the page. Enter the scenario writing section. Select the Create New Scenario option.
Types of Scenarios in Smart Life
There are two general types of scenarios in the Smart Life app:
1️⃣ Tap to Run mode
In this mode, the scenario is executed when you click on its name.
Tap to Run features:
Manual execution
Suitable for quick combination commands
Ideal for turning on/off multiple devices at the same time
📌 Example: By touching a scenario, the lights turn on, the curtains open, and the air conditioner turns off.
2️⃣ Automation mode
In this mode, the scenario is executed automatically based on environmental conditions or a specific schedule.
Automation features:
Execution based on time
Execution based on temperature, humidity, or motion
Execution based on the status of another device
📌 Example: If a motion sensor is activated → the hallway light turns on. If the ambient temperature reaches -2 degrees → the heater turns on.
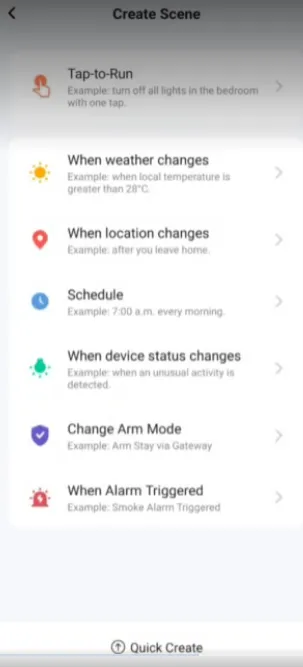
After entering the scenario creation section, you will be presented with several options:
First option: Tap to Run
Next options: Related to Automation mode
Tap to Run Mode: Getting to Know the IF and THEN Structure in Scenarios
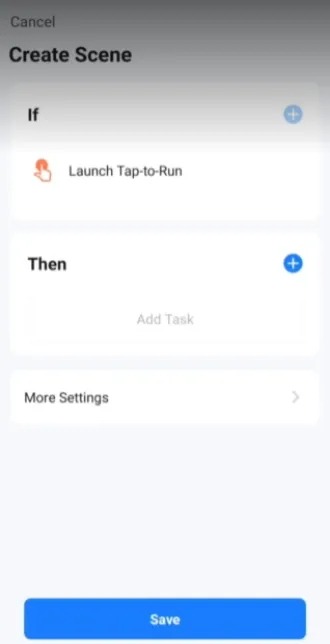
After selecting Tap to Run, you will enter a page with two main sections:
IF (if)
THEN (then)
The structure of this section is as follows:
If (IF) an event or command is executed → then (THEN) the specified commands are executed.
In the IF section, we define a condition and in the THEN section, we specify the final action.
Now, to have a better understanding of this rule, we will give two examples.
Example 1: “Leaving the house” scenario
🎯 Goal:
With one touch, all unnecessary equipment is turned off and the security system is activated.
Scenario Settings:
IF: Launch Tap-to-Run (by touching the scenario name)
THEN:
Turn off all lights
Turn off TV and air conditioner
Activate the alarm system (Armed Away)
Close the electric curtains
✅ Use of this scenario: When you are in a hurry and want to make sure everything is off and safe, you can put the house in the exit mode with just one click.
Example 2: “Guest Mode” scenario
🎯 Goal:
With one touch, the house space is ready for the presence of guests.
Scenario Settings:
IF: Launch Tap-to-Run
THEN:
Turn on the living room lights
Set the light to soft mode
Turn on the sound system
Set the air conditioner or heater temperature to the desired temperature
✅ Use of this scenario: Without having to adjust each device, you create a warm and welcoming environment with one touch.
Why are these examples suitable for Tap to Run mode?
Because in Tap to Run mode, the execution of commands depends on your touch, not the environmental condition. That is, whenever you want, just by selecting the scenario name, a set of functions will be executed simultaneously.
After the Launch Tap-to-Run option is added in the IF section, the scenario execution condition has been specified. In fact, from this point on, by touching the scenario name, the defined commands will be executed. Now we need to complete the THEN section according to the scenario’s purpose. This process is designed to be very simple and practical in the Smart Life application.
How to add commands in the THEN section
Click on the blue circle at the bottom of the page. A list of different options will be displayed to you. Select the option that suits the scenario you are writing.
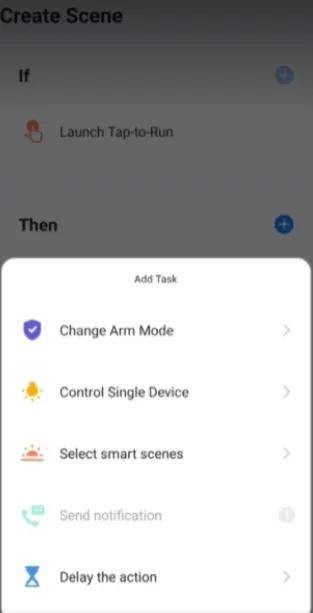
Introducing the Change Arm Mode option
The Change Arm Mode option is a software mode related to the alarm system and home security.
This option includes three different modes:
1️⃣ Disarmed
Disabling the security system
In this mode, none of the security sensors will be active.
2️⃣ Armed Stay
Activating the system when you are at home
In this mode:
Some sensors are active (for example, door and window sensors)
Some sensors are deactivated (for example, motion sensors inside the house)
This mode is suitable for when you are inside the house but you want the environment to be safe from the outside.
3️⃣ Armed Away
Full activation of the system when leaving the house
In this mode:
All security sensors are activated
The slightest movement or opening of the door will trigger an alarm
This option is for when you leave the house.
The relationship between Tap to Run mode and Automation in security scenarios
The general rule in this structure is as follows:
IF: Same as Launch Tap-to-Run (i.e., run the scenario by touching it)
THEN: Select one of the security modes (Disarmed / Armed Stay / Armed Away)
That is, you change the home security mode with one touch.
Control Single Device Option
By selecting Control Single Device, you can directly control any smart device, including electric curtains, cooling and heating systems, wall lights, ventilation fans, various sensors, smart switches.
Example 1: “Night Rest Mode” scenario
🎯 Goal: By touching a scenario, the room space is prepared for sleep.
Settings in the THEN section:
Control electric curtains → Close the curtains completely
Set the air conditioner to 24 degrees
Turn off the main room light
Turn on the night light
In this example, with one touch, several devices are set simultaneously.
Example 2: “Quick Exit from Room” Scenario
🎯 Goal: When leaving the room, turn off all unnecessary equipment.
Settings:
Turn off the TV
Turn off the lights
Turn off the fan
You can also use the Reverse Switch option to change only the device mode regardless of the current state.
Using Timer for delayed execution
On each device, you can use the Timer option.
📌 Example:
Suppose you want the hallway light to turn on. After 10 seconds, the fan will turn on.
The settings will look like this:
Control Single Device → Hallway Light → ON
Delay → 10 seconds
Control Single Device → Fan → ON
This type of execution is very useful for step scenarios.
Select Smart Scenes option
By selecting Select Smart Scenes, you can enable or disable the scenarios written in the Automation section.
📌 Example:
Suppose you have an automation scenario that turns on the air conditioner if the temperature rises.
You can determine via Tap to Run:
This automation is enabled (Enable)
or temporarily disabled (Disable)
⚠ Note:
Tap to Run scenarios cannot be enabled or disabled and are only executed by touching.
Delay The Action option (create a delay between commands)
This option is used to delay the execution of commands.
Step-by-step example
🎯 Scenario “Entering the house at night”
Objective:
Turn on the yard light
3 seconds delay
Turn on the hallway light
3 seconds delay
Activate the ventilation system
Setting sequence:
Control Single Device → Yard light → ON
Delay → 3 seconds
Control Single Device → Hallway light → ON
Delay → 3 seconds
Control Single Device → Ventilation → ON
This execution model creates a sense of intelligence and greater order.
More Settings section (Scenario customization)
In the More Settings section, you can:
Change the scenario icon
Specify the icon color
Set the display style
Enable or disable the Show on Home Page option
Save and run the scenario
Finally: Click Save. Choose a suitable and clear name for the scenario. After saving, the scenario is visible in the Tap to Run section. If Show on Home Page is enabled, it is also displayed on the home page. By touching it, all commands are executed in order.
Using the scenario writing feature in the Smart Life app, you can have a fully smart, secure and automated home. Whether you use Tap to Run scenarios to manually run multiple devices with one touch, or Automation scenarios to run automatically based on time, environmental conditions or device status changes, complete control of your home is in your hands.
To complete this smart experience, Dena Smart products, including smart switches and sockets, allow you to easily implement designed scenarios and manage all home equipment intelligently.
Also, with Dena Service, you can benefit from product warranties and be sure that after-sales service is provided in the best possible way. These two groups are professional partners of Dena Electric Iranian and provide you with a safe and complete smart home experience.